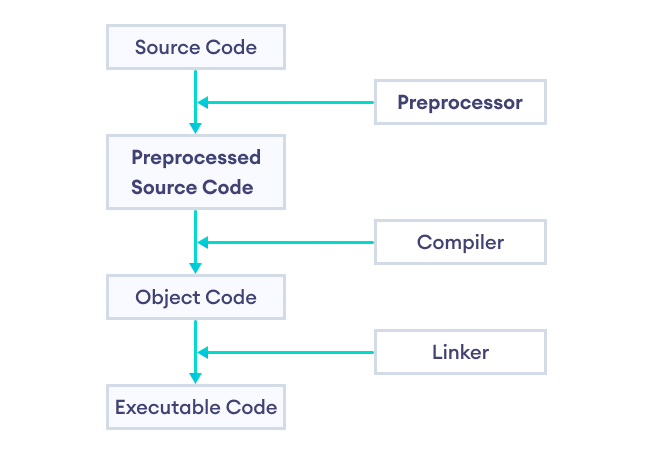
顾名思义,C++ 预处理器是在代码编译之前转换(预处理)我们的程序。
预处理器使用预处理器指令来控制代码转换。例如,
#include <iostream>这里,#include 是一个预处理器指令,它在编译程序之前将 <iostream> 头文件的内容插入到我们的程序中。

预处理器指令
在 C++ 中,所有预处理器指令都以 # 符号开头。例如,#include、#define、#if 等。
C++ 预处理器的常见应用包括:
#include- 用于包含头文件#define- 用于定义宏#if- 用于提供条件编译
现在,让我们详细了解这些预处理器指令。
#include 预处理器指令
#include 指令用于在我们的程序中包含头文件。例如,
#include <cmath>这里,cmath 是一个头文件。#include 指令指示预处理器将上面的代码行替换为 cmath 头文件的内容。
这就是为什么我们需要使用 #include <cmath> 来使用 pow() 和 sqrt() 等函数的原因。
我们也可以创建自己的自定义头文件,并使用 #include 指令在程序中使用它们。例如,
#include "path_to_file/my_header.h"这里,我们在程序中包含了名为 my_header.h 的自定义头文件。
通过这种方式,我们可以将一个大型程序分成多个文件。
#define 预处理器指令
#define 指令用于“定义”可以在程序中使用的预处理器变量。例如,
#define PI 3.1415 // value of pi现在,当我们在程序中使用 PI 时,它会被替换为 3.1415。
这里,PI 被称为 **宏**。宏是已被命名的代码片段。
示例 1:C++ #define
#include <iostream>

// create a macro named PI
// with the value 3.1415
#define PI 3.1415

using namespace std;

int main() {

    double radius, area;

    cout << "Enter the radius: ";
    cin >> radius;

    // use PI to calculate area of a circle
    area = PI * radius * radius;
    cout << "Area = " << area;

    return 0;
}
输出
Enter the radius: 4
Area = 50.264
类函数宏
我们还可以使用 #define 来创建像函数一样的宏。例如,
#define circleArea(r) (3.1415 * r * r)让我们看一个实际示例
#include <iostream>
#define PI 3.1415

// macro that calculates area of circle
// and takes parameter 'r'
#define circle_area(r) (PI * r * r)

using namespace std;

int main() {

    double radius = 2.5;

    // call the circle_area() macro
    // pass radius as an argument
    cout << "Area = " << circle_area(radius);

    return 0;
}
输出
Area = 19.6344
在这里,代码 circleArea(radius); 会展开为 3.1415 * 2.5 * 2.5。
注意: 使用函数比类函数宏更好,因为宏更容易出错。
#if 预处理器指令
#if 指令用于指示预处理器根据特定条件是否包含代码块。
在存在多个条件的情况下,它也可以与 #else 和 #elif 指令结合使用。
因此,#if、#else 和 #elif 指令与 C++ 中的 if...else 语句非常相似,但有一个主要区别。
if...else 语句在执行时进行测试,以检查是否应执行代码块。
另一方面,条件指令在编译之前由预处理器测试,以决定是否在程序中包含代码块。
这是一个简单的例子,
#include <iostream>

// create NUMBER macro with a value of 3
#define NUMBER 3

using namespace std;

int main() {

    // use #if directive to check
    // if NUMBER is greater than 0
    #if (NUMBER > 0)
        cout << NUMBER << " is greater than 0.";
    #else
        cout << NUMBER << " is less than 0.";
    #endif

    return 0;
}
输出
3 is greater than 0.
在这里,#endif 指令用于指示 #if 和 #else 指令的完成。
但是,在运行时决定执行哪部分代码时,if...else 语句比预处理器指令更受青睐。
尽管如此,在某些情况下 #if 指令更适用
- 根据操作系统使用不同的代码(平台特定代码)。
- 包含仅在调试版本中运行的调试代码(例如打印调试消息)。
- 根据特定条件打开或关闭功能。
- 包含特定于软件的特定版本或发行版的代码(版本特定代码)。
示例 2:平台特定 C++ 代码
#include <iostream>
using namespace std;

int main() {

    // include if running on windows
    #ifdef _WIN32
        cout << "Hello from Windows!" << endl;

    // include if running on linux
    #elif __linux__
        cout << "Hello from Linux!" << endl;

    // include if running on some other system
    #else
        cout << "Hello from an unknown platform!" << endl;
    #endif

    return 0;
}
输出
Hello from Linux!
这是使用条件编译的平台特定代码示例。
这里,
_WIN32- Microsoft Visual C++ 编译器在 Windows 平台上定义的宏__linux__- GNU C Compiler 在 Linux 系统上定义的宏#ifdef-#if的一个变体,它检查宏是否已被定义
宏 _WIN32 和 __linux__ 用于确定程序运行的系统。
预定义宏
以下是一些 C++ 编程中常用的预定义宏。
| 宏 | 值 |
|---|---|
__DATE__ |
包含当前日期的字符串。 |
__FILE__ |
包含当前执行程序的文件的字符串。 |
__LINE__ |
表示当前行号的整数。 |
__TIME__ |
包含当前时间 (GMT) 的字符串。 |
注意: 由于这些是 **预定义** 宏,因此我们无需使用 #define 指令即可使用它们。
示例 3:预定义宏
#include <iostream>
using namespace std;

int main() {

  // print the current time
  cout << "Current time: " << __TIME__;

  return 0;
}
输出
Current time: 04:23:31
此程序使用 __TIME__ 宏打印当前时间 (GMT)。