CSS 伪类选择器根据 HTML 元素的状态或位置来选择它们。例如,
button:hover {
    background-color: red;
    color:black;
}
浏览器输出
在这里,hover 伪类在鼠标悬停在按钮上时改变了按钮的样式。
伪类选择器的语法
伪类选择器的语法如下:
element:pseudo-class {
  /* CSS styles */
}
这里,
element:指定 HTML 元素-
pseudo-class:指定我们想要定位的元素的特定状态
伪类关键字被添加到选择器中,并以冒号 (:) 开头。
伪类的类型
CSS 中有以下几种伪类:
-
结构伪类:根据元素在文档中的位置选择元素,例如
:first-child、:last-child等。
-
链接伪类:根据链接的状态选择链接,例如
:link、:visited等。
-
UI 伪类:根据表单元素的状态选择表单元素,例如
:enabled、:disabled等。
让我们详细学习它们。
结构伪类
结构伪类根据元素在文档中的位置选择元素。有以下结构伪类。
CSS first-child 伪类
first-child 伪类选择器样式化其父元素的第一个子元素。例如,
<!DOCTYPE html>
<html lang="en">

    <head>
        <meta charset="UTF-8" />
        <meta name="viewport" content="width=device-width, initial-scale=1.0" />
        <title>CSS first-child</title>
        <link rel="stylesheet" href="style.css" />
    </head>

    <body>
        <div>
            <p>This is the first paragraph.</p>
            <p>This is the second paragraph.</p>
            <p>This is the third paragraph.</p>
        </div>
    </body>

</html>
div p:first-child {
color: red;
}浏览器输出

在这里,div p:first-child 选择器选择作为 div 元素的直接子元素的第一个段落元素,并将其颜色更改为 red。
CSS last-child 伪类
last-child 伪类选择器样式化其父元素的最后一个子元素。例如,
<!DOCTYPE html>
<html lang="en">

    <head>
        <meta charset="UTF-8" />
        <meta name="viewport" content="width=device-width, initial-scale=1.0" />
        <title>CSS last-child</title>
        <link rel="stylesheet" href="style.css" />
    </head>

    <body>
        <div>
            <p>This is the first paragraph.</p>
            <p>This is the second paragraph.</p>
            <p>This is the third paragraph.</p>
        </div>
    </body>

</html>
div p:last-child {
color: red;
}浏览器输出

在这里,div p:last-child 选择器选择作为 div 元素的直接子元素的最后一个段落元素,并将其颜色更改为 red。
CSS first-of-type 伪类
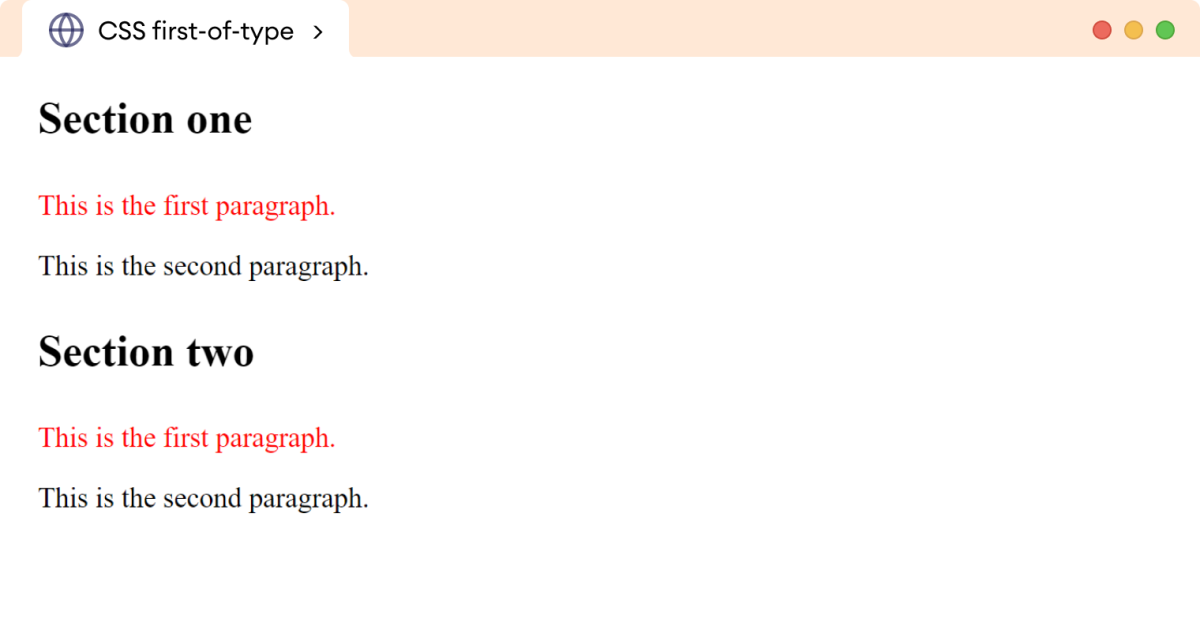
first-of-type 伪类选择器样式化父元素中特定类型的第一个元素。例如,
<!DOCTYPE html>
<html lang="en">
    <head>
        <meta charset="UTF-8" />
        <meta name="viewport" content="width=device-width, initial-scale=1.0" />
        <title>CSS first-of-type</title>
        <link rel="stylesheet" href="style.css" />
    </head>

    <body>
        <h2>Section one</h2>
        <div>
            <p>This is the first paragraph.</p>
            <p>This is the second paragraph.</p>
        </div>
        <h2>Section two</h2>
        <div>
            <p>This is the first paragraph.</p>
            <p>This is the second paragraph.</p>
        </div>
    </body>
</html>
p:first-of-type {
color: red;
}浏览器输出

在这里,first-of-type 伪类选择父元素中的第一个 p 元素,并将文本颜色更改为 red。
CSS not 伪类
not 伪类选择器样式化不匹配用户定义选择器的元素。例如,
<!DOCTYPE html>
<html lang="en">
    <head>
        <meta charset="UTF-8" />
        <meta name="viewport" content="width=device-width, initial-scale=1.0" />
        <title>CSS Pseudo-Classes</title>
        <link rel="stylesheet" href="style.css" />
    </head>

    <body>
        <div>
            <p>This is the first paragraph.</p>
            <p class="special-paragraph">This is a special paragraph.</p>
            <p>This is the third paragraph.</p>
        </div>
    </body>
</html>
p:not(.special-paragraph) {
color: red;
}浏览器输出

在上面的例子中:
p:not(.special-paragraph) {
    color: red;
}选择所有不是 special-paragraph 类的 p 元素。
这意味着第一个和第三个段落将是 red,但第二个段落不是。
CSS empty 伪类
empty 伪类选择器样式化所有没有子元素的元素。例如,
<!DOCTYPE html>
<html lang="en">
    <head>
        <meta charset="UTF-8" />
        <meta name="viewport" content="width=device-width, initial-scale=1.0" />
        <title>CSS Pseudo-Classes</title>
        <link rel="stylesheet" href="style.css" />
    </head>

    <body>
        <!--empty div-->
        <div></div>

        <!--div having child elements-->
        <div>
            <p>This is a paragraph.</p>
            <p>This is a paragraph.</p>
        </div>
    </body>
</html>
div:empty {
width: 100px;
height: 20px;
background-color: red;
}浏览器输出

在这里,empty 伪类只选择和样式化空的 div 元素。
链接伪类
链接伪类根据其状态选择链接。有以下链接伪类。
CSS link 伪类
link 伪类选择器样式化所有未访问的链接。例如,
<!DOCTYPE html>
<html lang="en">

    <head>
        <meta charset="UTF-8" />
        <meta name="viewport" content="width=device-width, initial-scale=1.0" />
        <link rel="stylesheet" href="style.css" />
        <title>CSS Pseudo-Classes</title>
    </head>

    <body>
        <p>Find additional information from <a href="#">here</a>.</p>
    </body>

</html>
a:link {
text-decoration: none;
color: blue;
font-weight: bold;
background-color: greenyellow;
}浏览器输出
从这里查找更多信息。
在这里,link 伪类选择并样式化在点击或访问之前的链接。
请注意,一旦我们点击链接,颜色就会变为 purple。这是链接的默认行为。
CSS visited 伪类
visited 伪类选择器样式化用户已访问的链接。例如,
<!DOCTYPE html>
<html lang="en">
<head>
<meta charset="UTF-8" />
<meta name="viewport" content="width=device-width, initial-scale=1.0" />
<link rel="stylesheet" href="style.css" />
<title>CSS Pseudo-Classes</title>
</head>
<body>
<p>Find additional information from <a href="#">here</a>.</p>
</body>
</html>/* styles the default state */
a:link {
    text-decoration: none;
    color: blue;
    font-weight: bold;
    background-color: greenyellow;
}
/* styles the visited state */
a:visited {
color: red;
}浏览器输出
从这里查找更多信息。
.
在上面的例子中,当用户点击链接时,颜色变为 red。
CSS focus 伪类
focus 伪类选择器样式化用户聚焦的元素。例如,
<!DOCTYPE html>
<html lang="en">

    <head>
        <meta charset="UTF-8" />
        <meta name="viewport" content="width=device-width, initial-scale=1.0" />
        <link rel="stylesheet" href="style.css" />
        <title>CSS Pseudo-Classes</title>
    </head>

    <body>
        <p>Find additional information from <a href="#">here</a>.</p>
    </body>

</html>
/* styles the focused state */
a:focus {
background-color: skyblue;
}浏览器输出
从这里查找更多信息。
在上面的例子中,a:focus 选择器在聚焦时用 skyblue 背景色样式化链接。
CSS hover 伪类
hover 伪类选择器在鼠标悬停在元素上时样式化元素。例如,
<!DOCTYPE html>
<html lang="en">

    <head>
        <meta charset="UTF-8" />
        <meta name="viewport" content="width=device-width, initial-scale=1.0" />
        <link rel="stylesheet" href="style.css" />
        <title>CSS Pseudo-Classes</title>
    </head>

    <body>
        <p>Find additional information from <a href="#">here</a>.</p>
    </body>

</html>
/* styles the link state */
a:link {
text-decoration: none;
color: blue;
font-weight: bold;
}
/* styles the visited state */
a:visited {
color: purple;
}/* styles the hover state */
a:hover {
background-color: greenyellow;
}浏览器输出
从这里查找更多信息。
在上面的例子中,a:hover 选择器在悬停时为链接添加背景色。
注意:hover 伪类可以与任何元素一起使用,而不仅仅是链接。
CSS active 伪类
active 伪类选择器在用户点击元素时样式化元素。例如,
<!DOCTYPE html>
<html lang="en">

    <head>
        <meta charset="UTF-8" />
        <meta name="viewport" content="width=device-width, initial-scale=1.0" />
        <link rel="stylesheet" href="style.css" />
        <title>CSS Pseudo-Classes</title>
    </head>

    <body>
        <p>Find additional information from <a href="#">here</a>.</p>
    </body>

</html>
/* styles the link state */
a:link {
text-decoration: none;
color: blue;
font-weight: bold;
background-color: greenyellow;
}
/* styles the visited state */
a:visited {
color: purple;
}
/* styles the hover state */
a:hover {
text-decoration: underline;
}/* styles the active state */
a:active {
color: red;
}浏览器输出
从这里查找更多信息。
在上面的例子中,a:active 选择器在链接处于活动状态时用 red 颜色样式化。
注意:提供链接伪类的顺序很重要。正确的顺序是 link、visited、hover 和 active,以确保样式正确应用。
UI 伪类
UI 伪类根据元素的状态或与用户的交互选择元素。
CSS enabled 伪类
enabled 伪类选择并样式化任何启用的元素。
如果一个元素可以被选中、点击、输入或接受焦点,则该元素被启用。
让我们看一个例子。
<!DOCTYPE html>
<html lang="en">

    <head>
        <meta charset="UTF-8" />
        <meta name="viewport" content="width=device-width, initial-scale=1.0" />
        <link rel="stylesheet" href="style.css" />
        <title>CSS Pseudo-Classes</title>
    </head>

    <body>
        <input type="text" placeholder="Enter your username" />
        <button>Submit</button>
    </body>

</html>
input:enabled {
border: 2px solid blue;
}浏览器输出
在这里,enabled 伪类选择 input 元素并添加一个 2px 的蓝色实线边框。
CSS disabled 伪类
disabled 伪类选择并样式化被禁用的元素。它可以是表单元素,如输入字段或按钮,用户无法与它们交互。
让我们看一个例子。
<!DOCTYPE html>
<html lang="en">

    <head>
        <meta charset="UTF-8" />
        <meta name="viewport" content="width=device-width, initial-scale=1.0" />
        <link rel="stylesheet" href="style.css" />
        <title>CSS Pseudo-Classes</title>
    </head>

    <body>
        <input type="text" placeholder="Username..." />
        <button disabled>Submit</button>
    </body>

</html>
button:disabled {
cursor: not-allowed;
}浏览器输出
在这里,当用户将鼠标悬停在禁用的按钮上时,cursor 属性将光标设置为 not-allowed。
注意:要使用 disabled 伪类选择器,我们需要将 disabled 关键字添加到 HTML 元素中。