技术文档页面是一个提供关于产品或流程的技术信息的网页。
它通常是为技术用户编写的,例如开发人员、工程师或 IT 专业人员。
在本教程中,我们将学习如何为我们的文档页面设置页眉、侧边栏菜单和主内容样式。
先决条件
要理解本教程,您应该对 HTML 和 CSS 有基本了解。如果您不熟悉 HTML 和 CSS,请阅读我们全面的 HTML 教程和 CSS 教程。
用于设计我们的技术文档页面的 CSS 概念
HTML 文档页面的布局
我们的 HTML 文档页面的最终布局将是这样的

方法
为了开发我们的技术文档,我们将遵循以下步骤
1. 首先,创建一个包含我们的徽标和主标题的页眉。
2. 创建一个带有目录的侧边栏。
3. 创建一个包含所有内容的主区域。
4. 最后,为我们的技术文档页面添加页脚。
让我们开始构建我们的页面。
重置浏览器样式表规则
在开始构建技术文档页面之前,让我们在 CSS 中重置浏览器的默认样式表,以更好地控制布局。
* {
    padding: 0;
    margin: 0;
    box-sizing: border-box;
}
将浏览器的 padding 和 margin 重置为 0 可以精确控制元素的 width 和 height。
此外,将 box-sizing 属性设置为 border-box 允许 padding 和 border 被包含在元素的宽度和高度内。
步骤 1:创建页眉
在第一步中,让我们创建一个包含徽标和主标题的页眉。
<!DOCTYPE html>
<html lang="en">

    <head>
        <meta charset="UTF-8" />
        <meta name="viewport" content="width=device-width, initial-scale=1.0" />
        <link rel="stylesheet" href="style.css" />
        <title>HTML Tutorial</title>
    </head>

    <body>

   <!-- header element consisting of a logo and a heading -->
        <header>
            <div class="logo-wrapper">
                <img
                    src="https://cdn.programiz.com/sites/tutorial2program/files/pc_logo.svg"
                    alt="Programiz Logo"
                />
            </div>
            <h1>HTML Tutorial</h1>
        </header>

    </body>
</html>
/* resets the browser default spacing */
* {
padding: 0;
margin: 0;
box-sizing: border-box;
}
body {
font-family: sans-serif;
width: 100%;
max-width: 760px;
margin: 0 auto;
}
/* styles the header element */
header {
height: 80px;
text-align: center;
position: relative;
border: 1px solid rgba(0, 0, 0, 0.26);
box-shadow: 0px 0px 4px 4px rgba(0, 0, 0, 0.116);
background-color: aliceblue;
}
/* styles for logo wrapper*/
header .logo-wrapper {
width: 100px;
position: absolute;
top: 50%;
left: 20px;
transform: translateY(-50%);
cursor: pointer;
}
/* styles to fit logo image within the logo wrapper */
.logo-wrapper img {
width: 100%;
height: 100%;
object-fit: cover;
}
/* style for the main heading of page */
header h1 {
line-height: 80px;
color: #25265e;
}浏览器输出
HTML 教程
这里,
- 在页眉中设置
position: relative允许.logo-wrapper(子元素)相对于它进行定位。否则,它将相对于文档,即 body 元素进行定位。
- 使用
position: absolute将.logo-wrapper从页眉流中移出,并允许在页眉内进行精确的定位。
top: 50%的值将徽标定位在页眉高度的50%处,而left: 20px将徽标从文档左侧移出20px。
- 为
h1元素设置line-height: 80px使其行高等于页眉的高度,从而在页眉内垂直居中文本。
步骤 2:创建侧边栏
现在,让我们为页面添加一个带有目录的侧边栏。
<!DOCTYPE html>
<html lang="en">

    <head>
        <meta charset="UTF-8" />
        <meta name="viewport" content="width=device-width, initial-scale=1.0" />
        <link rel="stylesheet" href="style.css" />
        <title>HTML Tutorial</title>
    </head>

    <body>
        <!--     header is  here -->

        <main class="main">
            <!-- a sidebar consisting of menu of documentation page -->
            <aside class="table-of-content">
                <h2 class="menu-heading">Table of Contents</h2>

                <!-- main menu of table of content -->
                <ul class="main-menu">
                    <li class="menu-sub-heading">Introduction</li>
                    <!-- submenu  -->
                    <ul class="sub-menu">
                        <li><a href="#what-is-html">What is HTML?</a></li>
                        <li><a href="#html-basics">HTML Basics</a></li>
                        <li>
                            <a href="#web-design-basics">Web Design Basics</a>
                        </li>
                    </ul>

                    <li class="menu-sub-heading">HTML Basics</li>
                    <!-- submenu  -->
                    <ul class="sub-menu">
                        <li>
                            <a href="#html-paragraphs">HTML Paragraphs</a>
                        </li>
                        <li><a href="#html-headings">HTML Headings</a></li>
                    </ul>

                    <li class="menu-sub-heading">HTML Inline</li>
                    <!-- submenu  -->
                    <ul class="sub-menu">
                        <li>
                            <a href="#block-and-inline">Block and Inline</a>
                        </li>
                        <li><a href="#html-links">HTML Links</a></li>
                    </ul>
                </ul>
            </aside>

            <!-- main content of documentation page will be here -->
        </main>

        <!-- footer will be here -->
    </body>
</html>
.table-of-content {
/* remaining width for the main content of page */
width: 30%;
height: 450px;
border: 1px solid rgba(0, 0, 0, 0.137);
color: #25265e;
padding: 8px;
/* makes the sidebar sticky */
position: sticky;
top: 0px;
}
.menu-heading {
margin-bottom: 20px;
font-size: 18px;
}
.table-of-content ul {
/* removes the bullet points in list items */
list-style-type: none;
/* list item marker is placed within the content area of the list item */
list-style-position: inside;
padding-left: 20px;
margin-bottom: 12px;
}
/* styles for sub-heading inside our menu */
.menu-sub-heading {
font-weight: bold;
text-decoration: none;
margin-bottom: 12px;
color: #25265e;
}
/* provides the bottom spacing for each list item in menu */
.sub-menu li {
margin-bottom: 16px;
}
/* color the menu item */
.table-of-content a {
color: #0556f3;
text-decoration: none;
}
/* change color of menu items while hovering */
.table-of-content a:hover {
color: #03338f;
}浏览器输出
HTML 教程
目录
在以上步骤中,
- 设置
width: 30%允许侧边栏占据视口或设备的30%宽度。
- 使用
position: sticky使侧边栏固定在页面顶部(0px),从而更轻松地导航整个内容。
- 伪类选择器
a:hover根据鼠标悬停状态设置链接的样式。
步骤 3:添加主区域
在本步骤中,我们将为技术文档页面添加所有内容。
<!DOCTYPE html>
<html lang="en">
<head>
<meta charset="UTF-8" />
<meta name="viewport" content="width=device-width, initial-scale=1.0" />
<link rel="stylesheet" href="style.css" />
<title>HTML Tutorial</title>
</head>
<body>
<!-- header is here -->
<main class="main">
<!-- a sidebar consisting of menu of documentation page -->
<!-- main content of the documentation page -->
<section class="main-content">
<h2 id="what-is-html">What is HTML?</h2>
<p>
HTML (HyperText Markup Language) is used to structure and
format the content of websites on the World Wide Web. Web
Developers use it to create a skeleton of modern websites
and web apps.
</p>
<p>
In simple words, HTML is the primary building block to
create and structure website content.
</p>
<h3>HyperText</h3>
<p>
HyperText is a way of organizing text that allows the reader
to easily navigate and access related information. It takes
the reader to a different part of the same web page, or to a
different web page altogether.
</p>
<h3>Markup Language</h3>
<p>
A markup language is a computer language that is used to add
structure and formatting to a text document. Markup
languages use a system of tags to define the structure and
content of a document. These tags are interpreted by a
program or application to display the document in a specific
way.
</p>
<hr class="section-break" />
<h2>Example of HTML</h2>
<p>Let's see a simple example of HTML.</p>
<pre class="code-block">
<code>
                    <!DOCTYPE html>
                    <html>
                        <head>
                            <title>programiz</title>
                        </head>
                        <body>
                            <h1>HTML Tutorial</h1>
                            <p>You'll learn about HTML.</p>
                        </body>
                    </html>
</code>
</pre>
<h3>Browser Output</h3>
<img
src="https://programiz.com.cn/sites/tutorial2program/files/html-example-on-browser.png"
alt="Browser Output"
/>
<hr class="section-break" />
<h2 id="html-basics">HTML Basics</h2>
<p>
HTML (HyperText Markup Language) is a markup language used
to structure and organize the content on a web page. It uses
various tags to define the different elements on a page,
such as headings, paragraphs, and links.
</p>
<h3>HTML Hierarchy</h3>
<p>
HTML elements are hierarchical, which means that they can be
nested inside each other to create a tree-like structure of
the content on the web page.
</p>
<p>
This hierarchical structure is called the DOM (Document
Object Model), and it is used by the web browser to render
the web page. For example,
</p>
<pre class="code-block">
<code>
                    <!DOCTYPE html>
                    <html>
                        <head>
                            <title>My web page</title>
                        </head>
                        <body>
                            <h1>Hello, world!</h1>
                            <p>This is my first web page.  </p>
                            <p>
                              It contains a <strong>main heading  </strong> and
                                <em> paragraph </em>.
                            </p>
                        </body>
                    </html>
</code>
</pre>
<h3>Browser Output</h3>
<img
src="https://programiz.com.cn/sites/tutorial2program/files/html-basics-hierarchy.png"
alt="HTML Example"
/>
<p>
In this example, the html element is the root element of the
hierarchy and contains two child elements: head and body.
The head element, in turn, contains a child element called
the title, and the body element contains child elements: h1
and p.
</p>
<hr class="section-break" />
<h2 id="web-design-basics">Web Design Basics</h2>
<p>
Web design refers to the process of creating and styling the
appearance of a website. There are 3 fundamental
technologies to build the modern website and web
applications. They are:
</p>
<ul>
<li>HTML</li>
<li>CSS</li>
<li>JS</li>
</ul>
<p>
These technologies work together to provide the structure,
style, and interactivity of a web page.
</p>
<h3>HTML</h3>
<p>
HTML (HyperText Markup Language) is a markup language used
to structure and organize the content on a web page. It uses
various tags to define the different elements on a page,
such as headings, paragraphs, and links. Let's see an
example:
</p>
<pre class="code-block">
<code>
                    <!DOCTYPE html>
                    <html>
                        <head>
                            <title>Page Title</title>
                        </head>
                        <body>
                            <h1>Programiz</h1>
                            <p>We create easy to understand programming tutorials.</p>
                        </body>
                    </html>
</code>
</pre>
<h3>Browser Output</h3>
<img
src="https://programiz.com.cn/sites/tutorial2program/files/web-design-basics-html-example.png"
alt="HTML example"
/>
<p>Here, we have an HTML document where:</p>
<ul>
<li>
<span><h1></span>— heading of the document
</li>
<li>
<span><p></span>—paragraph of the document
</li>
</ul>
<p>
The heading and paragraph tag in the above code help create
a webpage structure.
</p>
<h3>CSS</h3>
<p>
CSS (Cascading Style Sheets) is a stylesheet language. It is
used to style HTML documents.
</p>
<p>
It specifies how the elements of HTML look including their
layout, colors, and fonts. We use <style> tag to add
CSS to HTML documents. Let's add some CSS to our previous
HTML code.
</p>
<pre class="code-block">
<code>
                    <!DOCTYPE html>
                    <html>
                        <head>
                            <title>Page Title</title>
                            <style>
                                h1 {
                                    color: blue;
                                }
                                p {
                                    color: red;
                                }
                            </style>
                        </head>
                        <body>
                            <h1>Programiz</h1>
                            <p>We create easy to understand programming tutorial.</p>
                        </body>
                    </html>
</code>
</pre>
<h3>Browser Output</h3>
<img
src="https://programiz.com.cn/sites/tutorial2program/files/web-design-basics-css-example.png"
alt="HTML example"
/>
<p>
In the above code, we've applied CSS to <h1> and
<p> tags to change their text color. Notice the code,
</p>
<pre class="code-block">
<code>
                    h1 {
                        color: blue;
                    }
</code>
</pre>
<p>
This CSS code turns the text color of every <h1>
element into blue.
</p>
<hr class="section-break" />
<h2 id="html-paragraphs">HTML Paragraphs</h2>
<p>The HTML tag is used to create paragraphs. For example,</p>
<pre class="code-block">
<code><p>HTML is fun to learn.</p></code>
</pre>
<h3>Browser Output</h3>
<img
src="https://programiz.com.cn/sites/tutorial2program/files/html-paragraph.png"
alt="HTML Example"
/>
<p>
As we can see, a paragraph starts with the <p> and
ends with the </p> tag.
</p>
<hr class="section-break" />
<h2 id="html-headings">HTML Headings</h2>
<p>
The HTML heading tags (<h1> to <h6>) are used to
add headings to a webpage. For example,
</p>
<pre class="code-block">
<code>
                    <h1>This is heading 1.</h1>
                    <h2>This is heading 2.</h2>
                    <h3>This is heading 3.</h3>
                    <h4>This is heading 4.</h4>
                    <h5>This is heading 5.</h5>
                    <h6>This is heading 6.</h6>
</code>
</pre>
<h3>Browser Output</h3>
<img
src="https://programiz.com.cn/sites/tutorial2program/files/headings-in-html.png"
alt="HTML Example"
/>
<p>
In the example, we have used tags h1 to h6 to create
headings of varying sizes and importance.
</p>
<p>
The h1 tag denotes the most important heading on a webpage.
Similarly, h6 denotes the least important heading.
</p>
<p>
The difference in sizes of heading tags comes from the
browser's default styling. And, you can always change the
styling of heading tags, including font size, using CSS.
</p>
<hr class="section-break" />
<h2 id="block-and-inline">HTML Inline and Block Elements</h2>
<p>
HTML elements can be broadly categorized into one of two
categories:
</p>
<ul>
<li>
Inline Elements: <span>, <a>,
<strong>, <img> etc.
</li>
<li>
Block Elements: <p>, <div>, <h1>,
<figure> etc.
</li>
</ul>
<h3>HTML Inline Elements</h3>
<p>
Inline elements are displayed on the same line. They do not
start on a new line and take up only as much width as their
contents require. An example of an inline element is the
<span> tag.
</p>
<pre class="code-block">
<code>
<p>This is how <span style="border: 1px solid black">span</span> works. </p>
</code>
</pre>
<h3>Browser Output</h3>
<img
src="https://programiz.com.cn/sites/tutorial2program/files/html-inline-example.png"
alt="HTML Example"
/>
<hr class="section-break" />
<h2 id="html-links">HTML Links</h2>
<p>
HTML links or hyperlinks connect one resource on the web to
another. The resource may be an image, a web page, a
program, a video clip, an audio clip, an element within a
web page, etc, or anything that can be hosted on the
internet.
</p>
<p>
We use the HTML <a> tag to create hyperlinks. The
syntax for the <a> tag is
</p>
<pre class="code-block">
<code>
<a href="URL"> Text </a>
</code>
</pre>
<p>Here,</p>
<ul>
<li>URL - the destination of the link</li>
<li>Text - the part that will be visible as a link</li>
</ul>
<p>
Clicking on the text will navigate you to the resource in
the URL. For example,
</p>
<h3>Browser Output</h3>
<img
src="https://programiz.com.cn/sites/tutorial2program/files/html-link-example.png"
alt="HTML example"
/>
<p>
Here, clicking on the Swift Continue Statement will take you
to
</p>
<p>
<a
href="https://programiz.com.cn/swift-programming/continue-statement"
>https://programiz.com.cn/swift-programming/continue-statement.</a
>
</p>
</section>
<!-- main content of documentation page will be here -->
</main>
<!-- footer will be here -->
</body>
</html>.main {
/* default width is always 100% */
width: 100%;
/* aligns the sidebar and main content horizontally next to each other */
display: flex;
flex-direction: row;
/* adds 20px space between sidebar and main content */
gap: 20px;
border: 1px solid rgba(0, 0, 0, 0.26);
box-shadow: 0px 0px 4px 4px rgba(0, 0, 0, 0.116);
position: relative;
}
/* styes for the main content */
.main-content {
/* sets 70% width of the document, 25% is occupied by sidebar earlier,
and remaining for spacing between them */
width: 70%;
padding: 10px;
margin-left: auto;
}
h2,
h3 {
color: #25265e;
margin-bottom: 12px;
}
p {
margin-bottom: 24px;
line-height: 24px;
}
/* styles the under ordered list in main element */
.main ul {
list-style-position: inside;
padding-left: 20px;
margin-bottom: 12px;
}
/* adds a margin to top and bottom for hr element for spacing */
.section-break {
margin: 24px 0px;
}
/* styles the code block */
pre.code-block {
width: 100%;
padding: 12px;
border: 1px solid rgba(0, 0, 0, 0.13);
background-color: aliceblue;
margin-bottom: 24px;
white-space: pre-line;
}
/* images are allowed to shrink for smaller screen sizes */
.main-content img {
max-width: 100%;
}浏览器输出
HTML 教程
目录
什么是HTML?
HTML(超文本标记语言)用于在万维网上组织和格式化网站内容。网页开发人员使用它来创建现代网站和 Web 应用程序的骨架。
简单来说,HTML 是创建和组织网站内容的主要构建块。
超文本
超文本是一种组织文本的方式,它允许读者轻松地导航和访问相关信息。它可以将读者带到同一网页的不同部分,或者完全带到另一个网页。
标记语言
标记语言是一种计算机语言,用于为文本文档添加结构和格式。标记语言使用标签系统来定义文档的结构和内容。这些标签由程序或应用程序解释,以特定方式显示文档。
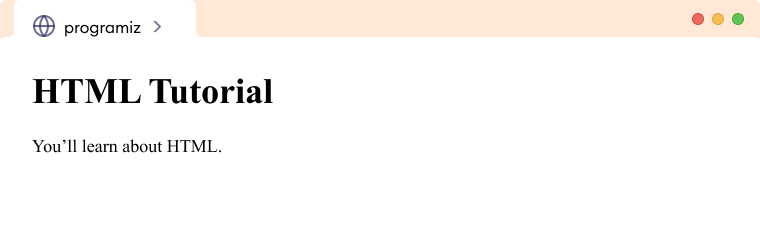
HTML 示例
让我们看一个简单的 HTML 示例。
<!DOCTYPE html>
<html>
<head>
<title>programiz</title>
</head>
<body>
<h1>HTML Tutorial</h1>
<p>You'll learn about HTML.</p>
</body>
</html>
浏览器输出
HTML基础
HTML(超文本标记语言)是一种用于组织和结构化网页内容的标记语言。它使用各种标签来定义页面上的不同元素,例如标题、段落和链接。
HTML 层级结构
HTML 元素是层级化的,这意味着它们可以嵌套在彼此内部,以创建网页内容类似树的结构。
这种层级结构称为 DOM(文档对象模型),Web 浏览器使用它来渲染网页。例如,
<!DOCTYPE html>
<html>
<head>
<title>My web page</title>
</head>
<body>
<h1>Hello, world!</h1>
<p>This is my first web page. </p>
<p>
It contains a <strong>main heading </strong> and
<em> paragraph </em>.
</p>
</body>
</html>
浏览器输出
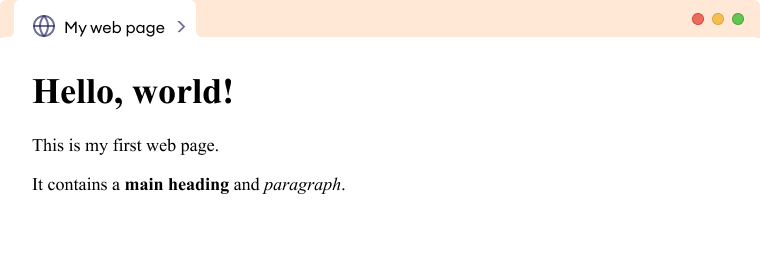
在此示例中,html 元素是层级结构的根元素,包含两个子元素:head 和 body。head 元素又包含一个名为 title 的子元素,而 body 元素包含子元素:h1 和 p。
网页设计基础
Web 设计是指创建和样式化网站外观的过程。构建现代网站和 Web 应用程序有 3 种基本技术。它们是
- HTML
- CSS
- JS
这些技术协同工作,为网页提供结构、样式和交互性。
HTML
HTML(超文本标记语言)是一种用于组织和结构化网页内容的标记语言。它使用各种标签来定义页面上的不同元素,例如标题、段落和链接。让我们看一个示例
<!DOCTYPE html>
<html>
<head>
<title>Page Title</title>
</head>
<body>
<h1>Programiz</h1>
<p>We create easy to understand programming tutorials.</p>
</body>
</html>
浏览器输出
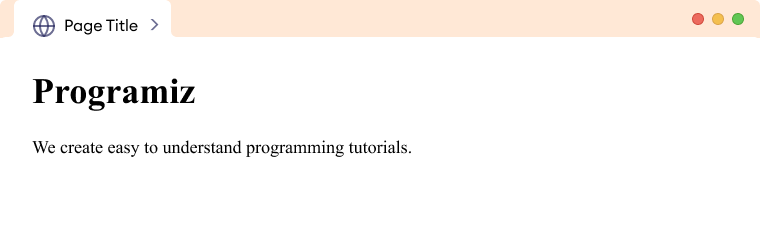
在这里,我们有一个 HTML 文档,其中
- <h1>— 文档的标题
- <p>— 文档的段落
以上代码中的标题和段落标签有助于创建网页结构。
CSS
CSS(层叠样式表)是一种样式表语言。它用于为 HTML 文档设置样式。
它规定了 HTML 元素的外观,包括它们的布局、颜色和字体。我们使用 <style> 标签将 CSS 添加到 HTML 文档中。让我们为之前的 HTML 代码添加一些 CSS。
<!DOCTYPE html>
<html>
<head>
<title>Page Title</title>
<style>
h1 {
color: blue;
}
p {
color: red;
}
</style>
</head>
<body>
<h1>Programiz</h1>
<p>We create easy to understand programming tutorial.</p>
</body>
</html>
浏览器输出
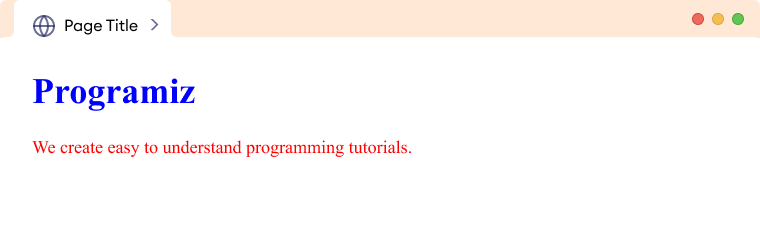
在上面的代码中,我们对 <h1> 和 <p> 标签应用了 CSS 来更改它们的文本颜色。请注意代码,
h1 {
color: blue;
}
此 CSS 代码将每个 <h1> 元素的文本颜色变为蓝色。
HTML段落
HTML 的 p 标签用于创建段落。例如,
<p>HTML is fun to learn.</p>
浏览器输出
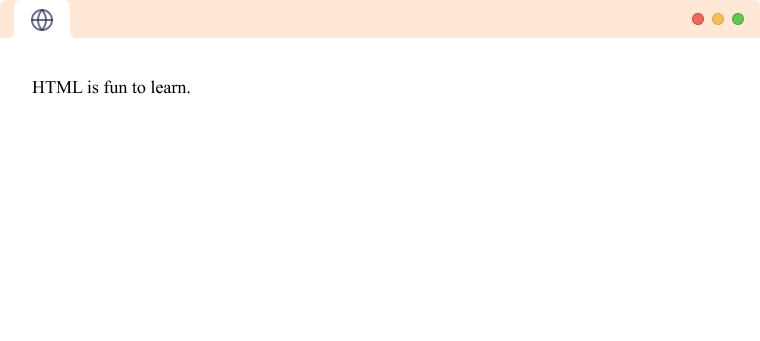
正如我们所见,段落以 <p> 开始,以 </p> 标签结束。
HTML标题
HTML 标题标签(<h1> 到 <h6>)用于为网页添加标题。例如,
<h1>This is heading 1.</h1>
<h2>This is heading 2.</h2>
<h3>This is heading 3.</h3>
<h4>This is heading 4.</h4>
<h5>This is heading 5.</h5>
<h6>This is heading 6.</h6>
浏览器输出

在示例中,我们使用了 h1 到 h6 标签来创建不同大小和重要性的标题。
h1 标签表示网页上最重要的标题。同样,h6 表示最重要的标题。
标题标签的大小差异来自浏览器的默认样式。而且,您可以使用 CSS 随时更改标题标签的样式,包括字体大小。
HTML 行内元素和块级元素
HTML 元素可大致分为两大类
- 内联元素:<span>、<a>、<strong>、<img> 等。
- 块级元素:<p>、<div>、<h1>、<figure> 等。
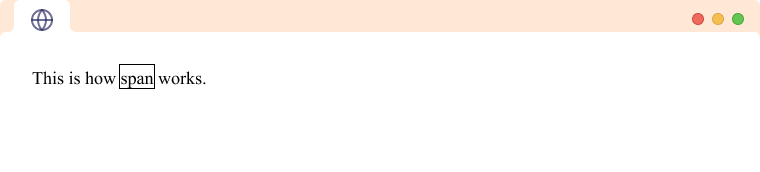
HTML 内联元素
内联元素显示在同一行上。它们不以新行开始,并且只占用其内容所需的宽度。内联元素的示例是 <span> 标签。
<p>This is how <span style="border: 1px solid black">span</span> works. </p>
浏览器输出
HTML链接
HTML 链接或超链接将 Web 上的一个资源连接到另一个资源。资源可以是图像、网页、程序、视频片段、音频片段、网页内的元素等,或任何可以托管在互联网上的内容。
我们使用 HTML <a> 标签来创建超链接。<a> 标签的语法是
<a href="URL"> Text </a>
这里,
- URL - 链接的目标
- 文本 - 将作为链接显示的文本部分
单击文本将把您导航到 URL 中的资源。例如,
浏览器输出
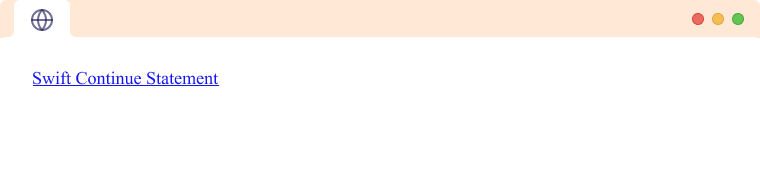
在这里,单击“Swift Continue Statement”将带您到
https://programiz.com.cn/swift-programming/continue-statement。
在以上步骤中,
- 为
<main>元素设置display: flex允许其直接子元素(sidebar和main-content部分)水平排列在一起。
- 在
.main-content元素上设置width: 70%允许文档信息占据可用宽度的70%,而之前分配了30%的侧边栏则占据剩余空间。
- 将
pre标签的white-space属性设置为pre-line消除了单行内的行间距。
- 将图像的
max-width设置为100%意味着图像将永远不会比其父容器宽。
步骤 4:添加页脚
在本步骤中,我们将为页面添加页脚。
<!DOCTYPE html>
<html lang="en">
<head>
<meta charset="UTF-8" />
<meta name="viewport" content="width=device-width, initial-scale=1.0" />
<link rel="stylesheet" href="style.css" />
<title>HTML Tutorial</title>
</head>
<body>
<!-- header goes in here -->
<!-- main element wrapping the sidebar menu and content -->
<!-- Adding a footer -->
<footer>
<p>HTML Documentation Page © Programiz, 2023</p>
</footer>
</body>
</html>/* reset browsers style */
* {
padding: 0;
margin: 0;
box-sizing: border-box;
}
/* style for footer */
footer {
height: 50px;
font-size: 14px;
text-align: center;
color: #25265e;
background-color: aliceblue;
border: 1px solid rgba(0, 0, 0, 0.26);
box-shadow: 0px 0px 4px 4px rgba(0, 0, 0, 0.116);
}
/* provide line-height same as height of footer to vertically center */
footer p {
line-height: 50px;
}浏览器输出
HTML 教程
HTML 文档页面 © Programiz, 2023
这里,
- 将页脚的
height设置为50px并将其子段落元素应用相同的line-height使内容垂直居中。
- 设置
text-align属性为center将内容水平居中对齐。
步骤 5:优化移动设备页面
最后,让我们添加媒体查询,使我们的 HTML 文档页面对移动设备响应式。
@media screen and (max-width: 672px) {

/* the sidebar and content are stacked on top of each other */
    .main {
        flex-direction: column;
    }

/* takes the full width of the document */
    .table-of-content {
        width: 100%;
        position: relative;
    }

/* takes the full width of document */
    .main-content {
        width: 100%;
    }
}
浏览器输出
HTML 教程
目录
什么是HTML?
HTML(超文本标记语言)用于在万维网上组织和格式化网站内容。网页开发人员使用它来创建现代网站和 Web 应用程序的骨架。
简单来说,HTML 是创建和组织网站内容的主要构建块。
超文本
超文本是一种组织文本的方式,它允许读者轻松地导航和访问相关信息。它可以将读者带到同一网页的不同部分,或者完全带到另一个网页。
标记语言
标记语言是一种计算机语言,用于为文本文档添加结构和格式。标记语言使用标签系统来定义文档的结构和内容。这些标签由程序或应用程序解释,以特定方式显示文档。
HTML 示例
让我们看一个简单的 HTML 示例。
        <!DOCTYPE html>
        <html>
            <head>
                <title>programiz</title>
            </head>
            <body>
                <h1>HTML Tutorial</h1>
                <p>You'll learn about HTML.</p>
            </body>
        </html>
浏览器输出
HTML基础
HTML(超文本标记语言)是一种用于组织和结构化网页内容的标记语言。它使用各种标签来定义页面上的不同元素,例如标题、段落和链接。
HTML 层级结构
HTML 元素是层级化的,这意味着它们可以嵌套在彼此内部,以创建网页内容类似树的结构。
这种层级结构称为 DOM(文档对象模型),Web 浏览器使用它来渲染网页。例如,
        <!DOCTYPE html>
        <html>
            <head>
                <title>My web page</title>
            </head>
            <body>
                <h1>Hello, world!</h1>
                <p>This is my first web page.  </p>
                <p>
                  It contains a <strong>main heading  </strong> and
                    <em> paragraph </em>.
                </p>
            </body>
        </html>
浏览器输出
在此示例中,html 元素是层级结构的根元素,包含两个子元素:head 和 body。head 元素又包含一个名为 title 的子元素,而 body 元素包含子元素:h1 和 p。
网页设计基础
Web 设计是指创建和样式化网站外观的过程。构建现代网站和 Web 应用程序有 3 种基本技术。它们是
- HTML
- CSS
- JS
这些技术协同工作,为网页提供结构、样式和交互性。
HTML
HTML(超文本标记语言)是一种用于组织和结构化网页内容的标记语言。它使用各种标签来定义页面上的不同元素,例如标题、段落和链接。让我们看一个示例
        <!DOCTYPE html>
        <html>
            <head>
                <title>Page Title</title>
            </head>
            <body>
                <h1>Programiz</h1>
                <p>We create easy to understand programming tutorials.</p>
            </body>
        </html>
浏览器输出
在这里,我们有一个 HTML 文档,其中
- <h1>— 文档的标题
- <p>— 文档的段落
以上代码中的标题和段落标签有助于创建网页结构。
CSS
CSS(层叠样式表)是一种样式表语言。它用于为 HTML 文档设置样式。
它规定了 HTML 元素的外观,包括它们的布局、颜色和字体。我们使用 <style> 标签将 CSS 添加到 HTML 文档中。让我们为之前的 HTML 代码添加一些 CSS。
        <!DOCTYPE html>
        <html>
            <head>
                <title>Page Title</title>
                <style>
                    h1 {
                        color: blue;
                    }
                    p {
                        color: red;
                    }
                </style>
            </head>
            <body>
                <h1>Programiz</h1>
                <p>We create easy to understand programming tutorial.</p>
            </body>
        </html>
浏览器输出
在上面的代码中,我们对 <h1> 和 <p> 标签应用了 CSS 来更改它们的文本颜色。请注意代码,
        h1 {
            color: blue;
        }
此 CSS 代码将每个 <h1> 元素的文本颜色变为蓝色。
HTML段落
HTML 的 p 标签用于创建段落。例如,
<p>HTML is fun to learn.</p>
浏览器输出
正如我们所见,段落以 <p> 开始,以 </p> 标签结束。
HTML标题
HTML 标题标签(<h1> 到 <h6>)用于为网页添加标题。例如,
        <h1>This is heading 1.</h1>
        <h2>This is heading 2.</h2>
        <h3>This is heading 3.</h3>
        <h4>This is heading 4.</h4>
        <h5>This is heading 5.</h5>
        <h6>This is heading 6.</h6>
浏览器输出
在示例中,我们使用了 h1 到 h6 标签来创建不同大小和重要性的标题。
h1 标签表示网页上最重要的标题。同样,h6 表示最重要的标题。
标题标签的大小差异来自浏览器的默认样式。而且,您可以使用 CSS 随时更改标题标签的样式,包括字体大小。
HTML 行内元素和块级元素
HTML 元素可大致分为两大类
- 内联元素:<span>、<a>、<strong>、<img> 等。
- 块级元素:<p>、<div>、<h1>、<figure> 等。
HTML 内联元素
内联元素显示在同一行上。它们不以新行开始,并且只占用其内容所需的宽度。内联元素的示例是 <span> 标签。
<p>This is how <span style="border: 1px solid black">span</span> works. </p>
浏览器输出
HTML链接
HTML 链接或超链接将 Web 上的一个资源连接到另一个资源。资源可以是图像、网页、程序、视频片段、音频片段、网页内的元素等,或任何可以托管在互联网上的内容。
我们使用 HTML <a> 标签来创建超链接。<a> 标签的语法是
<a href="URL"> Text </a>
这里,
- URL - 链接的目标
- 文本 - 将作为链接显示的文本部分
单击文本将把您导航到 URL 中的资源。例如,
浏览器输出
在这里,单击“Swift Continue Statement”将带您到
https://programiz.com.cn/swift-programming/continue-statement。
这里,
max-width: 672px当视口达到672px的最大宽度时,将布局从桌面切换到移动。
flex-direction: column将侧边栏和主内容垂直堆叠在一起。
- 将侧边栏和主内容的
width设置为100%使它们占据文档的全部宽度。
- 最后,
position: relative允许目录随滚动一起移动,确保了小尺寸移动设备上的良好用户体验。
注意:对于桌面布局,目录(侧边栏)和主内容(.main-content)并排定位,而对于移动布局,它们垂直堆叠。
文档页面的完整代码
这是我们在本教程中构建的 HTML 文档页面的最终代码。
<!DOCTYPE html>
<html lang="en">
<head>
<meta charset="UTF-8" />
<meta name="viewport" content="width=device-width, initial-scale=1.0" />
<link rel="stylesheet" href="style.css" />
<title>HTML Tutorial</title>
</head>
<body>
<!-- header element consisting of a logo and a heading -->
<header>
<div class="logo-wrapper">
<img
src="https://cdn.programiz.com/sites/tutorial2program/files/pc_logo.svg"
alt="Programiz Logo"
/>
</div>
<h1>HTML Tutorial</h1>
</header>
<main class="main">
<!-- a sidebar consisting of menu of documentation page -->
<aside class="table-of-content">
<h2 class="menu-heading">Table of Contents</h2>
<!-- main menu of table of content -->
<ul class="main-menu">
<li class="menu-sub-heading">Introduction</li>
<!-- submenu -->
<ul class="sub-menu">
<li><a href="#what-is-html">What is HTML?</a></li>
<li><a href="#html-basics">HTML Basics</a></li>
<li>
<a href="#web-design-basics">Web Design Basics</a>
</li>
</ul>
<li class="menu-sub-heading">HTML Basics</li>
<!-- submenu -->
<ul class="sub-menu">
<li>
<a href="#html-paragraphs">HTML Paragraphs</a>
</li>
<li><a href="#html-headings">HTML Headings</a></li>
</ul>
<li class="menu-sub-heading">HTML Inline</li>
<!-- submenu -->
<ul class="sub-menu">
<li>
<a href="#block-and-inline">Block and Inline</a>
</li>
<li><a href="#html-links">HTML Links</a></li>
</ul>
</ul>
</aside>
<!-- main content of documentation page will be here -->
<section class="main-content">
<h2 id="what-is-html">What is HTML?</h2>
<p>
HTML (HyperText Markup Language) is used to structure and
format the content of websites on the World Wide Web. Web
Developers use it to create a skeleton of modern websites
and web apps.
</p>
<p>
In simple words, HTML is the primary building block to
create and structure website content.
</p>
<h3>HyperText</h3>
<p>
HyperText is a way of organizing text that allows the reader
to easily navigate and access related information. It takes
the reader to a different part of the same web page, or to a
different web page altogether.
</p>
<h3>Markup Language</h3>
<p>
A markup language is a computer language that is used to add
structure and formatting to a text document. Markup
languages use a system of tags to define the structure and
content of a document. These tags are interpreted by a
program or application to display the document in a specific
way.
</p>
<hr class="section-break" />
<h2>Example of HTML</h2>
<p>Let's see a simple example of HTML.</p>
<pre class="code-block">
<code>
        <!DOCTYPE html>
        <html>
            <head>
                <title>programiz</title>
            </head>
            <body>
                <h1>HTML Tutorial</h1>
                <p>You'll learn about HTML.</p>
            </body>
        </html>
</code>
</pre>
<h3>Browser Output</h3>
<img
src="https://programiz.com.cn/sites/tutorial2program/files/html-example-on-browser.png"
alt="Browser Output"
/>
<hr class="section-break" />
<h2 id="html-basics">HTML Basics</h2>
<p>
HTML (HyperText Markup Language) is a markup language used
to structure and organize the content on a web page. It uses
various tags to define the different elements on a page,
such as headings, paragraphs, and links.
</p>
<h3>HTML Hierarchy</h3>
<p>
HTML elements are hierarchical, which means that they can be
nested inside each other to create a tree-like structure of
the content on the web page.
</p>
<p>
This hierarchical structure is called the DOM (Document
Object Model), and it is used by the web browser to render
the web page. For example,
</p>
<pre class="code-block">
<code>
        <!DOCTYPE html>
        <html>
            <head>
                <title>My web page</title>
            </head>
            <body>
                <h1>Hello, world!</h1>
                <p>This is my first web page.  </p>
                <p>
                  It contains a <strong>main heading  </strong> and
                    <em> paragraph </em>.
                </p>
            </body>
        </html>
</code>
</pre>
<h3>Browser Output</h3>
<img
src="https://programiz.com.cn/sites/tutorial2program/files/html-basics-hierarchy.png"
alt="HTML Example"
/>
<p>
In this example, the html element is the root element of the
hierarchy and contains two child elements: head and body.
The head element, in turn, contains a child element called
the title, and the body element contains child elements: h1
and p.
</p>
<hr class="section-break" />
<h2 id="web-design-basics">Web Design Basics</h2>
<p>
Web design refers to the process of creating and styling the
appearance of a website. There are 3 fundamental
technologies to build the modern website and web
applications. They are:
</p>
<ul>
<li>HTML</li>
<li>CSS</li>
<li>JS</li>
</ul>
<p>
These technologies work together to provide the structure,
style, and interactivity of a web page.
</p>
<h3>HTML</h3>
<p>
HTML (HyperText Markup Language) is a markup language used
to structure and organize the content on a web page. It uses
various tags to define the different elements on a page,
such as headings, paragraphs, and links. Let's see an
example:
</p>
<pre class="code-block">
<code>
        <!DOCTYPE html>
        <html>
            <head>
                <title>Page Title</title>
            </head>
            <body>
                <h1>Programiz</h1>
                <p>We create easy to understand programming tutorials.</p>
            </body>
        </html>
</code>
</pre>
<h3>Browser Output</h3>
<img
src="https://programiz.com.cn/sites/tutorial2program/files/web-design-basics-html-example.png"
alt="HTML example"
/>
<p>Here, we have an HTML document where:</p>
<ul>
<li>
<span><h1></span>— heading of the document
</li>
<li>
<span><p></span>—paragraph of the document
</li>
</ul>
<p>
The heading and paragraph tag in the above code help create
a webpage structure.
</p>
<h3>CSS</h3>
<p>
CSS (Cascading Style Sheets) is a stylesheet language. It is
used to style HTML documents.
</p>
<p>
It specifies how the elements of HTML look including their
layout, colors, and fonts. We use <style> tag to add
CSS to HTML documents. Let's add some CSS to our previous
HTML code.
</p>
<pre class="code-block">
<code>
        <!DOCTYPE html>
        <html>
            <head>
                <title>Page Title</title>
                <style>
                    h1 {
                        color: blue;
                    }
                    p {
                        color: red;
                    }
                </style>
            </head>
            <body>
                <h1>Programiz</h1>
                <p>We create easy to understand programming tutorial.</p>
            </body>
        </html>
</code>
</pre>
<h3>Browser Output</h3>
<img
src="https://programiz.com.cn/sites/tutorial2program/files/web-design-basics-css-example.png"
alt="HTML example"
/>
<p>
In the above code, we've applied CSS to <h1> and
<p> tags to change their text color. Notice the code,
</p>
<pre class="code-block">
<code>
        h1 {
            color: blue;
        }
</code>
</pre>
<p>
This CSS code turns the text color of every <h1>
element into blue.
</p>
<hr class="section-break" />
<h2 id="html-paragraphs">HTML Paragraphs</h2>
<p>The HTML tag is used to create paragraphs. For example,</p>
<pre class="code-block">
<code><p>HTML is fun to learn.</p></code>
</pre>
<h3>Browser Output</h3>
<img
src="https://programiz.com.cn/sites/tutorial2program/files/html-paragraph.png"
alt="HTML Example"
/>
<p>
As we can see, a paragraph starts with the <p> and
ends with the </p> tag.
</p>
<hr class="section-break" />
<h2 id="html-headings">HTML Headings</h2>
<p>
The HTML heading tags (<h1> to <h6>) are used to
add headings to a webpage. For example,
</p>
<pre class="code-block">
<code>
        <h1>This is heading 1.</h1>
        <h2>This is heading 2.</h2>
        <h3>This is heading 3.</h3>
        <h4>This is heading 4.</h4>
        <h5>This is heading 5.</h5>
        <h6>This is heading 6.</h6>
</code>
</pre>
<h3>Browser Output</h3>
<img
src="https://programiz.com.cn/sites/tutorial2program/files/headings-in-html.png"
alt="HTML Example"
/>
<p>
In the example, we have used tags h1 to h6 to create
headings of varying sizes and importance.
</p>
<p>
The h1 tag denotes the most important heading on a webpage.
Similarly, h6 denotes the least important heading.
</p>
<p>
The difference in sizes of heading tags comes from the
browser's default styling. And, you can always change the
styling of heading tags, including font size, using CSS.
</p>
<hr class="section-break" />
<h2 id="block-and-inline">HTML Inline and Block Elements</h2>
<p>
HTML elements can be broadly categorized into one of two
categories:
</p>
<ul>
<li>
Inline Elements: <span>, <a>,
<strong>, <img> etc.
</li>
<li>
Block Elements: <p>, <div>, <h1>,
<figure> etc.
</li>
</ul>
<h3>HTML Inline Elements</h3>
<p>
Inline elements are displayed on the same line. They do not
start on a new line and take up only as much width as their
contents require. An example of an inline element is the
<span> tag.
</p>
<pre class="code-block">
<code>
<p>This is how <span style="border: 1px solid black">span</span> works. </p>
</code>
</pre>
<h3>Browser Output</h3>
<img
src="https://programiz.com.cn/sites/tutorial2program/files/html-inline-example.png"
alt="HTML Example"
/>
<hr class="section-break" />
<h2 id="html-links">HTML Links</h2>
<p>
HTML links or hyperlinks connect one resource on the web to
another. The resource may be an image, a web page, a
program, a video clip, an audio clip, an element within a
web page, etc, or anything that can be hosted on the
internet.
</p>
<p>
We use the HTML <a> tag to create hyperlinks. The
syntax for the <a> tag is
</p>
<pre class="code-block">
<code>
<a href="URL"> Text </a>
</code>
</pre>
<p>Here,</p>
<ul>
<li>URL - the destination of the link</li>
<li>Text - the part that will be visible as a link</li>
</ul>
<p>
Clicking on the text will navigate you to the resource in
the URL. For example,
</p>
<h3>Browser Output</h3>
<img
src="https://programiz.com.cn/sites/tutorial2program/files/html-link-example.png"
alt="HTML example"
/>
<p>
Here, clicking on the Swift Continue Statement will take you
to
</p>
<p>
<a
href="https://programiz.com.cn/swift-programming/continue-statement"
>https://programiz.com.cn/swift-programming/continue-statement.</a
>
</p>
</section>
</main>
<footer>
<p>HTML Documentation Page © Programiz, 2023</p>
</footer>
</body>
</html>/* resets the browser default spacing */
* {
padding: 0;
margin: 0;
box-sizing: border-box;
}
body {
font-family: sans-serif;
width: 100%;
max-width: 760px;
margin: 0 auto;
}
/* styles the header element */
header {
height: 80px;
text-align: center;
position: relative;
background-color: aliceblue;
border: 1px solid rgba(0, 0, 0, 0.26);
box-shadow: 0px 0px 4px 4px rgba(0, 0, 0, 0.116);
}
/* styles for logo wrapper*/
header .logo-wrapper {
width: 100px;
position: absolute;
top: 50%;
left: 20px;
transform: translateY(-50%);
cursor: pointer;
}
/* styles to fit logo image within the logo wrapper */
.logo-wrapper img {
width: 100%;
height: 100%;
object-fit: cover;
}
/* style for the main heading of page */
header h1 {
line-height: 80px;
color: #25265e;
}
.table-of-content {
/* remaining width for the main content of page */
width: 30%;
border: 1px solid rgba(0, 0, 0, 0.137);
color: #25265e;
padding: 8px;
height: 450px;
/* makes the sidebar sticky */
position: sticky;
top: 0;
}
.menu-heading {
margin-bottom: 20px;
}
.table-of-content ul {
/* removes the bullet points in list items */
list-style-type: none;
/* list item marker is placed within the content area of the list item */
list-style-position: inside;
padding-left: 20px;
margin-bottom: 12px;
}
/* styles for sub-heading inside our menu */
.menu-sub-heading {
font-weight: bold;
text-decoration: none;
margin-bottom: 12px;
color: #25265e;
}
/* provides the bottom spacing for each list item in menu */
.sub-menu li {
margin-bottom: 16px;
}
/* color the menu item */
.table-of-content a {
color: #25265e;
}
/* change color of menu items while on hovering */
.table-of-content a:hover {
color: blue;
}
/* changes color while menu items are clicked */
.table-of-content a:active {
color: red;
}
.main {
/* default width is always 100% */
width: 100%;
/* aligns the sidebar and main content horizontally next to each other */
display: flex;
flex-direction: row;
gap: 20px;
border: 1px solid rgba(0, 0, 0, 0.26);
box-shadow: 0px 0px 4px 4px rgba(0, 0, 0, 0.116);
}
/* styes for the main content */
.main-content {
/* sets 70% width of the document, 25% is occupied by sidebar earlier,
and remaining for spacing between them */
width: 70%;
padding: 10px;
}
h2,
h3 {
color: #25265e;
margin-bottom: 12px;
}
p {
margin-bottom: 24px;
line-height: 24px;
}
/* styles the under ordered list in main element */
.main ul {
list-style-position: inside;
padding-left: 20px;
margin-bottom: 12px;
}
/* adds margin to top and botton for hr element for spacing */
.section-break {
margin: 24px 0px;
}
/* styles the code block */
pre.code-block {
width: 100%;
padding: 12px;
border: 1px solid rgba(0, 0, 0, 0.13);
background-color: aliceblue;
margin-bottom: 24px;
white-space: pre-line;
}
/* images are allowed to shrink for smaller screen sizes */
.main-content img {
max-width: 100%;
}
/* style for footer */
footer {
height: 50px;
font-size: 14px;
text-align: center;
color: #25265e;
background-color: aliceblue;
border: 1px solid rgba(0, 0, 0, 0.26);
box-shadow: 0px 0px 4px 4px rgba(0, 0, 0, 0.116);
}
/* provide line-height same as height of footer to vertically center */
footer p {
line-height: 50px;
}
/* adding media query for responsiveness */
@media screen and (max-width: 672px) {
/* the sidebar and content are stacked on top of each other */
.main {
flex-direction: column;
}
/* takes the full width of the document */
.table-of-content {
width: 100%;
position: relative;
}
/* takes the full width of document */
.main-content {
width: 100%;
}
}浏览器输出
HTML 教程
目录
什么是HTML?
HTML(超文本标记语言)用于在万维网上组织和格式化网站内容。网页开发人员使用它来创建现代网站和 Web 应用程序的骨架。
简单来说,HTML 是创建和组织网站内容的主要构建块。
超文本
超文本是一种组织文本的方式,它允许读者轻松地导航和访问相关信息。它可以将读者带到同一网页的不同部分,或者完全带到另一个网页。
标记语言
标记语言是一种计算机语言,用于为文本文档添加结构和格式。标记语言使用标签系统来定义文档的结构和内容。这些标签由程序或应用程序解释,以特定方式显示文档。
HTML 示例
让我们看一个简单的 HTML 示例。
<!DOCTYPE html>
<html>
<head>
<title>programiz</title>
</head>
<body>
<h1>HTML Tutorial</h1>
<p>You'll learn about HTML.</p>
</body>
</html>
浏览器输出
HTML基础
HTML(超文本标记语言)是一种用于组织和结构化网页内容的标记语言。它使用各种标签来定义页面上的不同元素,例如标题、段落和链接。
HTML 层级结构
HTML 元素是层级化的,这意味着它们可以嵌套在彼此内部,以创建网页内容类似树的结构。
这种层级结构称为 DOM(文档对象模型),Web 浏览器使用它来渲染网页。例如,
<!DOCTYPE html>
<html>
<head>
<title>My web page</title>
</head>
<body>
<h1>Hello, world!</h1>
<p>This is my first web page. </p>
<p>
It contains a <strong>main heading </strong> and
<em> paragraph </em>.
</p>
</body>
</html>
浏览器输出
在此示例中,html 元素是层级结构的根元素,包含两个子元素:head 和 body。head 元素又包含一个名为 title 的子元素,而 body 元素包含子元素:h1 和 p。
网页设计基础
Web 设计是指创建和样式化网站外观的过程。构建现代网站和 Web 应用程序有 3 种基本技术。它们是
- HTML
- CSS
- JS
这些技术协同工作,为网页提供结构、样式和交互性。
HTML
HTML(超文本标记语言)是一种用于组织和结构化网页内容的标记语言。它使用各种标签来定义页面上的不同元素,例如标题、段落和链接。让我们看一个示例
<!DOCTYPE html>
<html>
<head>
<title>Page Title</title>
</head>
<body>
<h1>Programiz</h1>
<p>We create easy to understand programming tutorials.</p>
</body>
</html>
浏览器输出
在这里,我们有一个 HTML 文档,其中
- <h1>— 文档的标题
- <p>— 文档的段落
以上代码中的标题和段落标签有助于创建网页结构。
CSS
CSS(层叠样式表)是一种样式表语言。它用于为 HTML 文档设置样式。
它规定了 HTML 元素的外观,包括它们的布局、颜色和字体。我们使用 <style> 标签将 CSS 添加到 HTML 文档中。让我们为之前的 HTML 代码添加一些 CSS。
<!DOCTYPE html>
<html>
<head>
<title>Page Title</title>
<style>
h1 {
color: blue;
}
p {
color: red;
}
</style>
</head>
<body>
<h1>Programiz</h1>
<p>We create easy to understand programming tutorial.</p>
</body>
</html>
浏览器输出
在上面的代码中,我们对 <h1> 和 <p> 标签应用了 CSS 来更改它们的文本颜色。请注意代码,
h1 {
color: blue;
}
此 CSS 代码将每个 <h1> 元素的文本颜色变为蓝色。
HTML段落
HTML 的 p 标签用于创建段落。例如,
<p>HTML is fun to learn.</p>
浏览器输出
正如我们所见,段落以 <p> 开始,以 </p> 标签结束。
HTML标题
HTML 标题标签(<h1> 到 <h6>)用于为网页添加标题。例如,
<h1>This is heading 1.</h1>
<h2>This is heading 2.</h2>
<h3>This is heading 3.</h3>
<h4>This is heading 4.</h4>
<h5>This is heading 5.</h5>
<h6>This is heading 6.</h6>
浏览器输出
在示例中,我们使用了 h1 到 h6 标签来创建不同大小和重要性的标题。
h1 标签表示网页上最重要的标题。同样,h6 表示最重要的标题。
标题标签的大小差异来自浏览器的默认样式。而且,您可以使用 CSS 随时更改标题标签的样式,包括字体大小。
HTML 行内元素和块级元素
HTML 元素可大致分为两大类
- 内联元素:<span>、<a>、<strong>、<img> 等。
- 块级元素:<p>、<div>、<h1>、<figure> 等。
HTML 内联元素
内联元素显示在同一行上。它们不以新行开始,并且只占用其内容所需的宽度。内联元素的示例是 <span> 标签。
<p>This is how <span style="border: 1px solid black">span</span> works. </p>
浏览器输出
HTML链接
HTML 链接或超链接将 Web 上的一个资源连接到另一个资源。资源可以是图像、网页、程序、视频片段、音频片段、网页内的元素等,或任何可以托管在互联网上的内容。
我们使用 HTML <a> 标签来创建超链接。<a> 标签的语法是
<a href="URL"> Text </a>
这里,
- URL - 链接的目标
- 文本 - 将作为链接显示的文本部分
单击文本将把您导航到 URL 中的资源。例如,
浏览器输出
在这里,单击“Swift Continue Statement”将带您到
https://programiz.com.cn/swift-programming/continue-statement。